Setting up an Ubuntu 22.04 Server with RAID1 and LVM

Although setting up a simple single-drive Ubuntu server is a good start for building your self-hosted cloud, adding a second drive as a RAID array to the system from the start will give you far improved reliability and a greater sense of security for your data. Even if you have a drive fail, you have a redundant mirrored drive to keep your data safe and operational until you can replace the failed drive.

Additionally, LVM affords you the ability to somewhat future-proof your storage by essentially creating a virtual disk that you can migrate between physical disks and expand without needing to worry about the underlying storage configuration being a limiting factor.

Here's how to set up a RAID1 mirrored system with LVM from the start.

  • Plug in your network
  • Boot Ubuntu 22.04 Live from USB
  • Select your English, and hit enter
  • Leave layout and variant as English (US) and hit enter
  • Leave the type of install as Ubuntu Server and hit enter
  • Leave Network connections as-is (assuming you use DHCP on your network) and hit enter
  • Leave Configure server Proxy address blank and hit enter
  • Leave Configure Ubuntu archive mirror as-is and hit enter
  • Under Guided storage configuration, select Custom storage layout and hit the space bar
  • Select Done and hit enter
  • Storage configuration
    • Clear all partitions from your drives (if existing partitions/RAID exist)
    • You should now have 2 identically-sized drives with all free space under AVAILABLE DEVICES
    • For each of your drives under AVAILABLE DEVICES...
      • Tab to select the local disk and hit enter
      • Tab to select Use As Boot Device (or Add As Another Boot Device) and hit enter
      • Tab- to select free space under that drive and hit enter
      • Tab- to select  Add GPT Partition and hit enter
        • Tab, then hit enter
        • Tab to select Leave unformatted, then hit enter
        • Tab to select Create then hit enter
    • Select Create software RAID (md) and hit enter
      • Leave Name as md0 and tab
      • Leave RAID Level as 1 (mirrored) and tab
      • Tab to the first of you drives' partitions labeled as partition 2 and hit Space to choose it
      • Tab to the second of you drives' partitions labeled as partition 2 and hit Space to choose it
      • Tab to Create and hit enter
    • Under md0 select free space and hit enter
    • Select  Add GPT Partition and hit enter
      • Set the Size to 2G and hit tab
      • Tab again, leaving Format set to ext4
      • On Mount, hit enter, then select /boot, then hit enter
      • Tab to select Create then hit enter
    • Under md0 select free space again and hit enter
    • Select  Add GPT Partition and hit enter
      • Leave the Size blank and hit tab
      • Hit enter on Format, select Leave unformatted, and hit enter
      • Tab to select Create then hit enter
    • Select Create volume group (LVM) and hit enter
      • Leave Name set to vg0 and hit tab
      • Under md0 select partition 2 and hit space to choose it
      • Tab to Create and hit enter
    • Under vg0 (new) select free space and hit enter
    • Select Create Logical Volume and hit enter
      • Leave the Name set to lv-0
      • Select Create and hit enter
    • Select Done and hit enter
    • On the Confirm destructive action screen, select Continue and hit enter
    • Congrats! You made it past the most complicated part of the installation!
  • Profile setup...
    • Beside the Your name field,  type in your full name and hit tab
    • For Your server's name, you can use whatever name you want. Might I suggest selfserve01 if you don't have a name in mind. Hit tab when done.
    • For Pick a username,  enter the username you wish to create for yourself, and hit tab.
    • Enter a password of your choosing, hit tab and confirm it, then hit tab
    • With Done selected, hit enter
    • Leave Skip for now checked on the Ubuntu Pro advert
    • Tab to Continue and hit enter
    • Press Space to choose Install OpenSSH server
    • Tab to Done and hit enter
    • Leave the Featured Server Snaps as-is
    • Tab to Done and hit enter
    • Wait for the installation to complete
    • You should see one of two messages when you are ready to reboot:
      • Cancel update and reboot, which you can select if you just want to move on and do updates later
      • Reboot Now, which you can wait for if you want to start up with a fully updated system from the start.

Ideally at this point we should get the mdraid service set up to email us about drive failures. For now, we'll have to wait until we get some basic mail server capabilities installed.

The Self-Hosted Cloud

For a while I've wanted to do a series on how to set up your own "cloud" services, written from a newbie perspective. The goal is to help the common computer user extricate themselves from commercial and ad-supported services that tend to have your data and content surveilled, monetized by AI, and censored.

Just writing up some rough notes on where I think the direction of this project should be. This is a work in a progress:

  • Buying a home server and/or NAS
  • Setting up VPN'ed IP
    • Setting up a VPS (or two)
    • Setting up a VPN (Wireguard)
    • Setting up your Firewall (Using some NAT voodoo)
      • SD-WAN? https://flexiwan.com/ maybe?
  • Setting up a Hypervisor
    • XCP-NG
    • Xen Orchestra
  • Setting up a VM
    • Install Ubuntu 20.04
    • Convert VM to Template
  • Setting up Docker
    • New VM from Template
  • Installing BIND in Docker
  • Registering your own domain
  • Configuring your domain in BIND
  • Setting up LetsEncrypt certs with automatic DNS (re-)validation
  • Cloudy-type Services (Docker containers unless otherwise specified):
    • Installing and bootstrapping an LDAP server
    • Installing an Nginx proxy
    • Drive: Installing NextCloud
    • Password Manager: NextCloud+ KeePass2
    • Email: Installing a mail server suite (Mailu, Mailcow?)
    • Photos: Installing Piwigo
      • https://github.com/xmanyou/piwigo-docker/blob/master/docker-compose.yml
    • Streaming: Installing Plex
    • Blogging: Installing WordPress
    • Cameras: Shinobi CCTV
    • Home Automation: Installing HomeAssistant
      • Almond?
      • Garage Door Opener
      • Doorbell
  • DR/Contingency/Redundancy Planning
    • Remote backup strategies
    • Integration with VPS-type services

Elegoo Saturn First-time Use Notes

  • Install the latest firmware: https://www.elegoo.com/blogs/3d-printing/elegoo-saturn-3d-printer-support-files
  • Enable Folders gcode: https://github.com/Photonsters/CBD-based-printers-list/blob/master/Saturn/Saturn-Enable-UI-Folders.gcode

Tips, Tricks, and Notes on running RAID1 and RAID5 on XCP-NG: Part 2

This is a continuation of a series. See Part 1 here.

Now that I have the base system installed on a RAID1 array, along with a Local Storage Repo residing there, I want to create an array for "bulk" storage. I have 3 8TB disks I want to put into a RAID5 array. This will give me a 16TB block device I can use as a sort of home NAS. Since this is RAID5, we can more efficiently expand this storage just by adding another 8TB+ disk. Additionally, I can use LVM to effectively split this storage between NAS storage and another Local Storage Repo for larger VM disk allocations.

Prep the disks

Before we do anything, we need to adjust the device timeouts on EACH drive you have installed. It's not uncommon for SATA to take a long time to recover from an error, and if this results in a controller reset, you can risk RAID array failure and data loss. For more info on this, I would recommend reading https://strugglers.net/~andy/blog/2015/11/09/linux-software-raid-and-drive-timeouts/ . This article mentions setting the timeout on the disks. In my case, even though the command to set the timeouts didn't fail, it never seemed to work, as the timeout values could not be listed and verified. Instead, to be safe, I'd recommend applying the 180 second (3 minute) timeout to all the drives you have in your system using this command:

for disk in `ls /sys/block/*/device/timeout` ; do echo 180 > $disk ; done

Then add a udev rule so that it applies on startup AND when new drives are inserted:

cat << EOF > /etc/udev/rules.d/60-set-disk-timeout.rules.test

# Set newly inserted disk I/O timeout to 3 minutes
ACTION=="add", SUBSYSTEMS=="scsi", DRIVERS=="sd", ATTRS{timeout}=="?*", RUN+="/bin/sh -c 'echo 180 >/sys$DEVPATH/timeout'"
EOF

systemctl restart systemd-udevd

Next, I would recommend removing all partitions on each disk and re-setting the disk labels to GPT. Beware! This and pretty much everything to follow is destructive. Be sure you are working with the correct disk! Checking the "dmesg" command output after inserting a new disk is usually how I verify.

parted /dev/sdz

# Respond with Y to confirm all data on the disk will be lost

Partition the drives (replacing /dev/sdz with your disk) . Repeat this for each of your disks:

echo -en "mklabel gpt\nmkpart primary ext4 0% 100%\nset 1 raid on\nalign-check optimal 1\nprint\nquit\n" | parted -a optimal /dev/sdz

RAID5 and LVM Setup

Now, let's build our RAID5 array:

mdadm --create --verbose /dev/md6 --level=5 --raid-devices=3 /dev/sdx /dev/sdy /dev/sdz

# Set up mdmonitor mail
# In /etc/ssmtp/ssmtp.conf:
mailhub=mail.your-smtp-server.com

# In /etc/mdadm.conf:
MAILADDR address@youremail.com

Then partition the resulting md device to have one large LVM partition

gdisk /dev/md6

# Commands within gdisk...
p
# You should see no partitions

n
# Hit Enter (3x) when asked for partition number, first, and last sectors
# Use a Hex code of 8e00 for the filesystem type of Linux LVM
p
# You should then see something like this as your partition table, with a different size, obviously:
Number  Start (sector)    End (sector)  Size       Code  Name
   1            2048     31255572446   14.6 TiB    8E00  Linux LVM

# Write partition table and exit gdisk:
w

# Answer "Y" to confirmation to write GPT data

To clarify the above, here are the commands that are run in gdisk:

(p)rint partition tables
(n)ew partition
(enter) Use partition number 1 (default)
(enter) Start at first sector on device (default)
(enter) End at last sector on device (default) 
(8e00) Linux LVM partition code
(p)rint the partition table
(w)rite the partition table and exit 

Next, let's set up LVM using the partition:

# Tell the kernel to reload the partition table
partprobe /dev/md6

# Create the Physical Volume
pvcreate --config global{metadata_read_only=0} /dev/md6p1

# Create the Volume Group "BulkStorage00"
vgcreate --config global{metadata_read_only=0} BulkStorage00 /dev/md6p1

# Set the volume groups active so they come back up on reboot
vgchange --config global{metadata_read_only=0} -ay

### ??? Edit /etc/grub.cfg and remove "nolvm" from the "XCP-ng" menu entry

# Not sure if this is needed, but doesn't hurt (rebuild init ram fs)
dracut --force

Activating Volume Groups on Boot

Disclaimer: I know, I know. This is admittedly a hack. There's probably a better way of doing this that fits within the design of XCP-NG that I'm not aware of. If someone suggests a better way of handling this, I'll gladly update here.

When we need to reboot, our Logical Volumes won't be active. I believe this has something to do with XCP-NG/XenServer's unique handling of LVM. I've banged my head on this problem for far too long, so begrudgingly, here's the workaround to it:

# Make rc.local executable
chmod u+x /etc/rc.local

# Enable the rc.local service
systemctl enable rc-local

# Add our vgchange activation command to rc.local
echo "vgchange --config global{metadata_read_only=0} -ay ; sleep 1" >> /etc/rc.d/rc.local

Local Storage Repository

Now let's create a 200GB logical volume (start small as we can expand later)

lvcreate --config global{metadata_read_only=0} -L 200G -n "RAID_5_Storage_Repo" BulkStorage00

And create the Storage Repo in XCP-NG (using the "ext" filesystem for thin provisioning)

xe sr-create content-type=user device-config:device=/dev/disk/by-id/dm-name-BulkStorage00-RAID_5_Storage_Repo host-uuid=<tab_to_autocomplete_your_host_uuid> name-label="RAID 5 Storage Repo" shared=false type=ext

And that's it! The above creates another set of LVM layers on top of your existing BulkStorage00/RAID_5_Storage_Repo logical volume which consists of a physical volume, volume group, and logical volume that are natively managed by XCP-NG. You should now have a 200GB storage repo named "RAID 5 Storage Repo" in XCP-ng Center and/or XOA. Next, let's set up a bulk store to share out via SMB/CIFS...

Bulk Storage Share Setup

First let's allocate 500GB of that space for another Logical Volume named "BulkVolume00"

lvcreate --config global{metadata_read_only=0} -L 500G -n "BulkVolume00" BulkStorage00

And lets format it with EXT4

mkfs.ext4 /dev/BulkStorage00/BulkVolume00

Let's set up /etc/fstab (edit with vi or nano) to mount the device by adding the following line to the end of the file

/dev/BulkStorage00/BulkVolume00 /opt/BulkVolume00       ext4    rw,noauto        0 0

And lets create a mount point for the device and mount it

mkdir /opt/BulkVolume00
mount /opt/BulkVolume00

We'll also want to set this up to mount on boot (note, as above with our Storage Repository, we have to use a workaround to mount this AFTER the logical volumes have been activated

echo "mount /opt/BulkVolume00" >> /etc/rc.d/rc.local

And lastly, lets get that shared out via SMB

# Install Samba server
yum --enablerepo base,updates install samba

# Make a backup copy of the original SMB configuration (just in case)
cp -rp /etc/samba/smb.conf /etc/samba/smb.conf.orig

Then edit /etc/samba/smb.conf, erasing the contents and using this as your template:

[global]
        workgroup = MYGROUP
        # This must be less than 15 characters.
        # Run "testparm" after editing this file to verify.
        netbios name = XCP-NG-WHATEVER
        security = user
        map to guest = Bad User

[BulkVolume00]
	comment = Bulk RAID5 Storage Volume
	path = /opt/BulkVolume00
	guest ok = yes
	writable = yes
        read only = no
	browseable = yes
        force user = root
	create mode = 0777
	directory mode = 0777
	force create mode = 0777
	force directory mode = 0777

Note that this is set up to be very permissive for use on a secured/home network. Setting this up for more elaborate security is beyond the scope of this tutorial.

Next let's (re)start samba, and poke the required holes in the firewall

# Verify your smb.conf is sane
testparm
# Enable and start samba services
systemctl enable smb.service
systemctl enable nmb.service
systemctl start smb.service
systemctl start nmb.service

# Edit "/etc/sysconfig/iptables" and add the following lines below the port 443 rule:
-A RH-Firewall-1-INPUT -m conntrack --ctstate NEW -m udp -p udp --dport 137 -j ACCEPT
-A RH-Firewall-1-INPUT -m conntrack --ctstate NEW -m udp -p udp --dport 138 -j ACCEPT
-A RH-Firewall-1-INPUT -m conntrack --ctstate NEW -m tcp -p tcp --dport 139 -j ACCEPT
-A RH-Firewall-1-INPUT -m conntrack --ctstate NEW -m tcp -p tcp --dport 445 -j ACCEPT

# Then restart iptables to apply
systemctl restart iptables

Finally, test this share in Windows (or your favorite SMB/CIFS client) by opening the URI to your server's IP, ex: \\192.168.1.2\BulkVolume00\

The next installment of this series will be a rough collection of tips on managing this XCP-NG RAID5 combo. Stay tuned.

Disabling the Windows 10 "This app is preventing you from restarting/shutting down/logging off" screen

Sometimes Microsoft befuddles me. Scratch that. Not sometimes. Usually.

Take for example the "new" log-off/shutdown/restart behavior. Used to be by default in Windows 7 that when you shut down, you'd receive prompts about applications that were preventing shutdown. In most cases, this would be an unsaved document. You could simply click desired option (Save, or Don't Save), and Windows would continue logging you out, unless it came upon another unsaved document. Rinse and repeat until you've closed all your unsaved documents, and Windows would finally log you out.

Now in Windows 10, you get that generic blue screen with a list of apps left to shut down, with only two options: Shutdown anyway, or Cancel. Neither of these are good options. One stops your shutdown, and you have to manually go through all your open apps and close them one by one. The other simple force closes all your apps, losing anything you might not have saved.

Thankfully, this setting is easily reverted to the legacy behavior with either a registry entry change, or a Group Policy change (which affects the same registry entry). To apply, use this reg file: Enable-AllowBlockingAppsAtShutdown.reg

Windows Registry Editor Version 5.00

[HKEY_LOCAL_MACHINE\SOFTWARE\Policies\Microsoft\Windows\System]
"AllowBlockingAppsAtShutdown"=dword:00000001

You can also find this setting in the Group Policy editor (Start, Run: gpedit.msc) under Computer Configuration > Administrative Templates > System > Shutdown Options > Turn off automatic termination of applications that block or cancel shutdown:

Override Windows Explorer Win Key Hotkeys

For years now I've been using an awesome clipboard manager utility by JoeJoe Soft called ArsClip. One of the nice features of the program is the ability to set a custom hotkey for the clipboard manager clip list. In my case, I like to use the Ctrl+Win+V combo to invoke this feature. This can be set in the ArsClip INI file with these variables set:

%USERPROFILE%\AppData\Roaming\Arsclip\arsclip.ini

Hotkey_Key=86
Hotkey_Alt=0
Hotkey_Shift=0
Hotkey_Ctrl=1
Hotkey_Winkey=1

There's one problem though: Apparently Microsoft reserves the use of the Win key. If, as in my case, you start using Win+Something and it works for a while, a Windows 10 update could suddenly replace your cool clipboard functionality with something like, say, their own lame clipboard manager, or in my case, something completely useless and dumb like "Shoulder Taps".

I suspect that there may be a clean way of having AutoHotKey take over these hotkeys and re-route them to ArsClip (or whatever application you want), however I couldn't figure out how to make that happen.

There is a solution however. If you can start your app before the Explorer shell gets a chance to, then you effectively reserve those hotkeys for your app, and Explorer can't use them. For a while, I'd do this by killing the explorer.exe process, run ArsClip, then re-start Explorer. Not ideal, but workable. I eventually came up with a better solution: Fire up ArsClip upon login, before Explorer starts, by using the Userinit registry key and a batch file to manage the timing. Here's the batch file (C:\USERINIT.BAT):

@echo off
REM Start ArsClip and continue
start "" "C:\Program Files (x86)\ArsClip\ArsClip.exe"
REM Wait 2 seconds for ArsClip to start up and register hotkeys
timeout /t 2
REM Start the Explorer shell via UserInit.exe
%SystemRoot%\System32\Userinit.exe
exit

Save that to C:\USERINIT.BAT
Then make this Registry modification (or save this to a .reg file and run):

Windows Registry Editor Version 5.00

[HKEY_LOCAL_MACHINE\SOFTWARE\Microsoft\Windows NT\CurrentVersion\Winlogon]
"Userinit"="C:\\USERINIT.BAT"

Now when you log off and back on, ArsClip will start before Explorer, and your Win+Ctrl+V hotkey will work! Dirty hack? Maybe. If you know a better solution (such as some AHK magic as mentioned above) I'd love to hear about it.

Note that this modification will apply to all users of your computer. If you needed it to apply to just yourself, you may need to wrap it in some batch file logic, like so (untested):

@echo off
if '%username%' == 'myusername' goto hotkeyapps
goto userinit

:hotkeyapps
start "" "C:\Program Files (x86)\ArsClip\ArsClip.exe"
timeout /t 2
goto userinit

:userinit
%SystemRoot%\System32\Userinit.exe
exit

Good luck!

Tips, Tricks, and Notes on running RAID1 and RAID5 on XCP-NG: Part 1

Note: This article series is specifically written with XCP-NG in mind, however if you are using XenServer, it is possible that some if not all of this is still applicable. YMMV.

Recently when installing XCP-NG on my home server, I ran into some persistent issues with setting up RAID1 on my boot disks, and setting up RAID5 for my secondary/bulk Local Storage Repository. Here are my notes and tips on succeeding with an installation such as this.

I have a chassis with 2x400GB SATA disks in a RAID1 array used for the boot disks that hold the OS and the first Local Storage Repository, and 3 8TB SATA disks in a RAID5 array with LVM on top, serving as both a Local Storage Repository as well as a bulk storage served via SMB/CIFS/NFS as a sort of NAS.

Installation Prep

Starting from scratch, we might want to wipe all the partition tables, boot records, and/or RAID superblocks on each target disk. This is optional, but if you know you don't care about the data on your disks, it should help ensure success in case you had a prior installation of a RAID superblock or the GRUB bootloader on any of the disks. If you care about the data on any of the disks in your system, power off, unplug those disks, and start over. Boot up the installation disk, and type Alt+F2 to get to the console, then run the following:

WARNING, THIS IS DESTRUCTIVE:

for dev in `ls /dev/md*` ; do mdadmin --stop $dev ; done

for dev in `ls /dev/sd[a-z]+` ; do echo "Wiping Partitions and MBR on $dev" ; dd if=/dev/zero of=$dev bs=512 count=1 ; done

Next, reboot to start the installer over again, ensuring we start with a clean slate. Run the following to verify:

lsblk

You should see no partitions or raid labels (ie, md127) on any of your target disks. If you do, you may need to re-run the above and try again.

Installation

Proceed as normal with the installation prompts, selecting the Software RAID option when it comes up.

Select the two (or more) disks you wish to add to the RAID1 array, then enter Create

Select your RAID disk as the install target (usually md127)

Select your RAID disk for your local storage (usually md127)

Proceed as normal with installation

When the install starts, type Alt+F2 to go to the CLI console

Run this to see the RAID resync process:

while true ; do tput clear ; date ; mdadmin --detail /dev/md127 | grep -v ^$ | grep -e ^ -e "Resync Status.*"; sleep 10 ; done

You should see a line starting with "Resync Status" indicating the percentage complete.

You may type Alt+F1 to go back to the installation progress screen.

Once the installation is complete, DO NOT REBOOT YET! I suspect this was the cause of an issue I had on one of my attempts doing this. The RAID1 array needs to finish syncing, or else you may be missing the required MBR/GRUB information on one of your disks, and your system may fail to boot if the non-synced disk happens to be the first in your BIOS/HBA boot order. Type Alt+F2 to go back to the CLI console and re-check the Resync Status progress. Once it reaches 100% complete and is in a State of "clean", you may proceed.

Type Alt+F1 and finish the installation as normal.

Continue on with Part 2 in this series

A new era, a new look

Well, the Atathualpa theme has served me well since I first migrated my blog to WordPress from Slashcode (yeah, crazy). However we live in a new world now, with a growing majority of web traffic coming from mobile devices. It's time I got with the times and used a responsive design theme. So I've made a switch to the TwentyFifteen theme. I'm going minimalist for now, and will likely bring modifications back in as I see value.

Jetpack Broke My Comments

Yay.

So apparently "JetPack Comments" broke my comments, causing recent comments to get posted to the wrong thread. They claim it's not their fault, saying that it's due to a lack of implementation of the comment_form() function in WordPress, but Atahualpa seems to support this just fine. Well, anyhow, for now I'll be disabling JetPack Comments on my blog. So if you want to comment, you'll have to sign up. I know. It's a pain. I'll get it fixed.

Update 6/10/2015: After switching themes to TwentyFifteen, the problem seems to be gone. JetPack Comments re-enabled.

Adfree Breaks Pinterest on Android

If you're like me, you like keeping your Android device screen free from ads. AdFree from BigTinCan is an invaluable tool in assisting with this by customizing your hosts file on a rooted Android phone so that any ad network links get redirected to your phone, effectively disabling ads. The side effect of using host-based ad blocking is that sometimes valid sites get blocked as well.

"I don't always do Pinterest, but when I do, I prefer pinning homebrew stuff." And unfortunately, Adfree blocks pinning on Android. You'll notice this when doing any pin outside of a re-pin (ie, within your pin feed). The app will churn saying it's finding images, but then finally fail with the popup error "Sorry, couldn't find any pinnable images on this page". The issue is that the Pinterest app requires access to a few hostnames that Adfree hijacks:

  • api.pinterest.com
  • assets.pinterest.com
  • log.pinterest.com

This solution to this is fairly simple. Thankfully, BigTinCan offers an option to set up a customizable exception list but of course you'll have to register for a free account. Once you have registered, add exceptions for each of the hosts above. Then sign in to your account on the AdFree android app and update your hosts. You should now be able to pin to your heart's content.

Let me know if this helped you!

Pebble Smartwatch Skins

One of my biggest beefs with the Pebble is the plastic case. These guys have a solution to not only the scratchability of the case, but the plain black style. The woodgrain one looks really nice, and is probably the one I would go with if I were to get a Pebble.

AHK Script to Clean Up Dead PuTTY Sessions

I have a love-hate relationship with tabbed interfaces. On one hand, they keep my taskbar clean. On the other, they merely scuttle my window-hoarding behaviors into a single window, where the mess grows into a pile of outdated, unused tab sessions (i.e., Firefox). I also have need for some types of programs to be opened in separate windows on a regular basis, such as SSH sessions, where I often work on multiple related tasks which have to be monitored simultaneously. In those instances, the number of PuTTY sessions I have open (and have disconnected) can quickly grow out of control, clogging my taskbar.

PuTTY Fatal Error

Here's a quick script I wrote to clean up any inactive/disconnected PuTTY windows: Cleanup PuTTY Windows

Fix for Chromecast "No Cast devices found"

Every so often I run into a Chromecast user who says they can't get their PC to find their Chromecast. More often than not, it's due to a bug in how the Chromecast plugin handles multiple network connections. The Chromecast plugin assumes that your primary active network connection is on the same LAN as your Chromecast dongle. Obviously this is not always the case, especially in the case of VPN users. What you have to do is move that connection to the top priority in your network connection list.

Here's how you fix the dreaded "No Cast devices found" issue. This is for Windows 7, but probably works with 8 and Vista as well:
1) If you are connected to a VPN, disconnect it and try detecting the Chromecast again. Still not working? Proceed...
2) Go to the Network and Sharing Center
3) Click "Change Adapter Settings"
4) Click the Advanced menu and select "Advanced Settings..." (Alt+N, S)
5) Find the network connection that shares the same LAN as your Chromecast and select it
6) Repeatedly click the green up arrow until that connection is at the top of the list.
7) Click OK to close the dialog and apply the new connection priority settings
8) Try detecting your Chromecast again

If you use a VPN, you may be wondering why you have to disconnect. The answer is that many VPN clients manage the connection priority of the virtual adapter they create and automatically moves it to the top of the list. It's best just to disconnect and try again instead of battling that behavior.

Good Luck! I hope this helps someone out there!

If you found this helpful, maybe you'd like to send a thank you from my wishlist?

Brewblog: All-Grain Bavarian Hefeweisen (Northern Brewer)

Just a quick update on my homebrewing adventures.

Finally got around to doing my first AG brew using my new mash tun, using the Northern Brewer Bavarian Hefeweisen kit. The crushed grain sat in my garage for a couple weeks, then got tossed into the kegerator for storage for the next 4-5 months. Hopefully the grains didn't go stale and affect the flavor of the malt. As this was my first AG experience, I had a slight hurdle with the volume of the strike (?) water. I was attempting to do the more complex multi-step protein/saccharide rests, and may have started out with far too much water. Thus I ended up with about 9 gallons of liquid that needed to be boiled down to ~5. I still don't fully understand what grain/water  target ratio I should be using at mash-in. Needless to say, I burned off a good amount of propane just boling off those 4 gallons of excess liquid.

I'm unsure of how to properly calculate mash tun efficiency, however what I do know is that the listen target for original gravity was 1.049, and I ended up with 1.046. I was hoping for higher, as I did rinse the grain pretty well (or so I thought), and by comparison, my experience with the extract version of this kit has resulted in an OG of as high as 1.052. The comparison might not be valid though.

Fermentation was very active, as usual, finishing up it's frothy activity within the first 36-48 hours. This time around I didn't have any issues with blowoff.

So, with any luck, I should have a perfectly drinkable beverage in just under 4 weeks. Now to figure out where to re-fill my 10# CO2 cylinder.

Here's my current brewhouse/pub status:

On deck:        Pumpkin Ale (Indie)
Primary:        Bavarian Hefeweisen (Northern Brewer)
Secondary 1:    Empty
Secondary 2:    Empty
Keg 1:          Tapped-out
Keg 2:          Tapped-out
Keg 3:          Tapped-out
Keg 4:          Tapped-out

HowTo Resolve StartSSL (StartCom) Domain Blacklisted: Domain appears on a blacklist

Does this look familiar to you?

startssl-blacklist

Welcome to my world. Not sure at this point how I got on this list, how to get off it, or even where this list is. But perhaps my findings will help you resolve the same issue for your domain. At this point, my suspicion is that it's due to and odd report from Google Safe Browsing that "Yes, this site has hosted malicious software over the past 90 days. It infected 0 domain(s), including .". It would be great if I knew what the malware/badware is/was so that I could remove it. Even more odd is that my supposed infection infected no other sites.

Oh well. More to come...

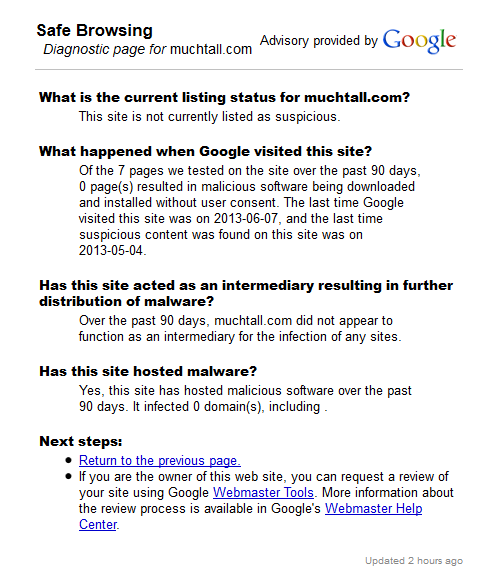
Update: I've emailed "Certmaster" and they responded letting me know that they see my domain on Google's Safe Browsing blacklist results. Oddly enough, here are the results:
googlesafebrowsing

I see the report that "Yes, this site has hosted malicious software over the past 90 days. It infected 0 domain(s), including ." What's odd about this is that when I check my Google Webmaster tools, the site reports that "Google has not detected any malware on this site.", and it seems I'm not the only one. Not sure if I'm just bitten by a previously unseen issue that I've since cleaned up with WordPress updates or what.

Given the date that is shown above (2013-05-04), I'd guess that the "past 90 days" implies I'll have to wait until 2013-08-04 for this status to clear. I guess that's the penalty I pay for lack of diligence in monitoring the updates and health of my server up until then. If you're saying to yourself "I can't wait that long!", you do have the option of paying StartSSL the fee required for them to manually intervene in what would otherwise be an automated process. I choose to wait it out: I don't really need SSL for anything practical. For my purposes, it's just for the sake of writing articles like this: research and writing howto's based upon my experiences. So I'll be waiting out the presumably prerequisite "90 days" for the sake of research.

See you on 8/4 with an update!

Update 8/15: As the saying goes: "Time heals all wounds". I'm now off the naughty list for Google. Now to (re-)try obtaining a cert from StartSSL...

Accidental Evangelist

It's been a while since updating my blog with anything overtly Catholic. I guess work, family, and life in general started to consume far more of my time in last several years. Non-geek-related posts have been sparse to non-existent. It's been bothering me some privately in recent months with elections coming, and now gone. There's so much topical matter to cover, and unfortunately, most of it gets posted to Facebook where my audience is limited (and intentionally so).

If been feeling that, as a result, I haven't been doing a very good job of being an active evangelist for Catholicism. It's been taking a back seat to being charitable with my technical knowledge. I've gained a lot of knowledge from peers in the past 15+ years, and this blog is one of the ways I like to "pay forward" that generosity.

Which brings me to this blog article by Creative Minority Report: Accidental Evangelism.

I think my sense of charity directly, and most specifically a personal impressibility to be actively charitable stems from my Catholic upbringing. I'd could only hope that some person reading this blog would be converted (at least in part) by my actions.

May God bless, and the grace of God be with you!

Solution to the NVidia Gray/Grayscale Screen Problem

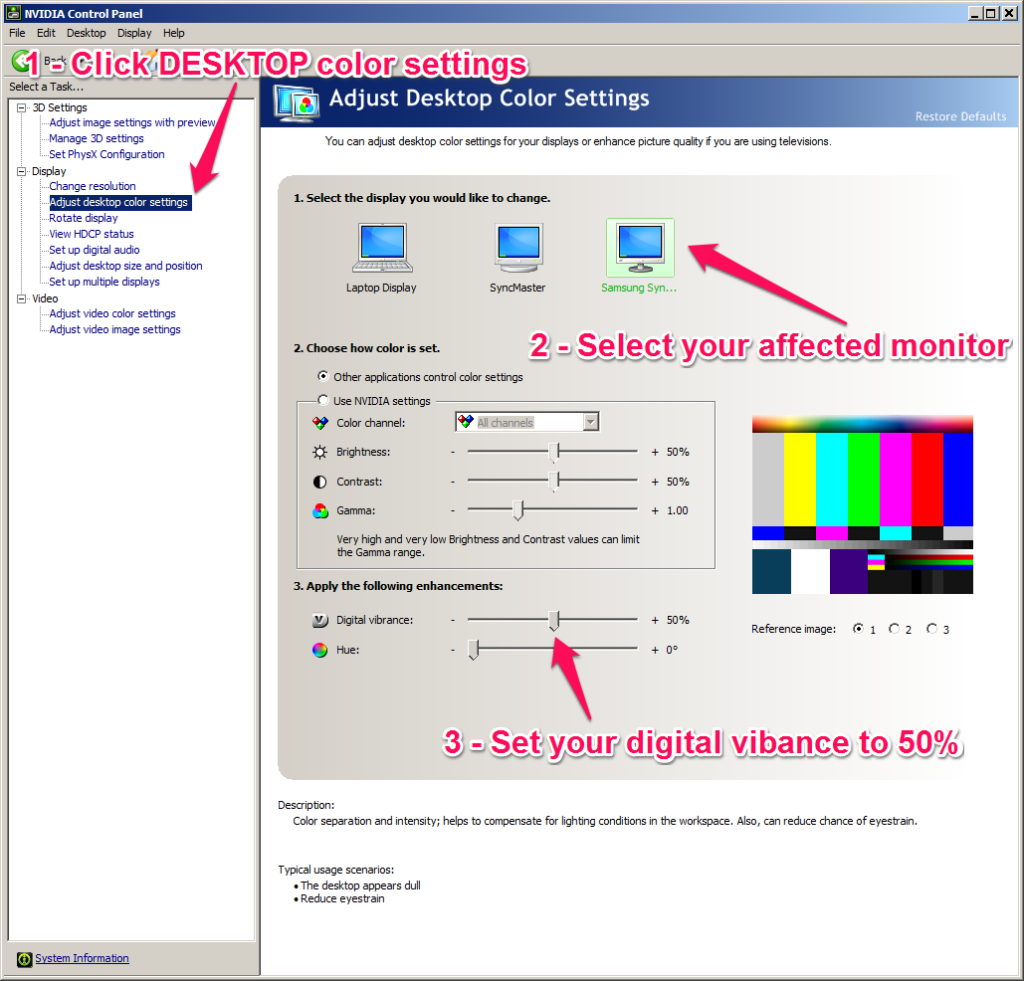
Today I came in to work to find that the video output for my Dell Latitude e6520 laptop's NVidia head was displaying in black and white. At first I thought that the problem was a driver bug, something wrong with the video memory, or a faulty display. But eventually I found out that, somehow (without any user interaction with the applicable setting), the "Digital Vibrance" setting was set to 0%, when it should be 50%. Below you'll see a simple annotated screenshot showing where you can quickly fix this.

Nvidia Gray Screen Problem - Annotated

Good luck!

Streaming RTMP with VLC and RTMPDump

This quick post is as much for your benefit as for the benefit of my memory...

To stream RTMP with VLC, you'll need rtmpdump, which you can get here: http://rtmpdump.mplayerhq.hu/. I used rtmpdump-2.4-git-010913-windows.zip, though you may be able to use the latest version. I also had VLC 2.0.6 32-bit installed. Once installed, you can run the following from a cmd window:

rtmpdump.exe -r "rtmp://your.domain.com:1935/yoururl/here" -v -o - | vlc.exe -

This worked nicely for me. YMMV. Good luck!

If you found this helpful, maybe you'd like to send a thank you from my wishlist?

FFMPEG "Server error: Not Found" with Short URLs

Just a quick post about a problem I helped a buddy of mine resolve. He was setting up a Helix media streaming server, and was trying to capture the stream data to a file with the following command:

ffmpeg -i "rtmp://10.132.245.4:1935/flash/meet.flv" out.flv

The result was this error in the output:

[rtmp @ 0x28e1dc0] Server error: Not Found

Oddly enough, the connection information shown on the Helix console showed that a strange URL was being requested. Upon further investigation with Wireshark, I found that this was the request being made.

play('\360xw0meet')

Note that "\360" is a hex character. For some odd reason, it would appear that ffmpeg improperly handles short URLs, inserting a string of "\360xw0". If you pad the URL with the current directory "./", then the request succeeds:

ffmpeg -i "rtmp://10.132.245.4:1935/flash/./././././meet.flv" out.flv

This results in a request of

play('././././meet')

Which worked fine in our environment.

For future reference, I was running this ffmpeg version (on CentOS 6.4 x86_64):

ffmpeg version N-53616-g7a2edcf Copyright (c) 2000-2013 the FFmpeg developers
built on May 29 2013 00:19:54 with gcc 4.4.7 (GCC) 20120313 (Red Hat 4.4.7-3)

So if you're running into the "Server error: Not Found" error on a known good URL, try padding the path of the stream with "./" and see if that fixes it for you. I'm guessing this is an ffmpeg bug, but don't really have the access to a streaming server to troubleshoot and submit a bug report. From the time that I did have, it appears that it's related to the .flv extension in the rtmp URL. If you drop the extension, the URL can be of any size.

Brewblog: Rubbermaid 50 Quart Mash Tun

After several months of lingering in my garage, I finally finished my 50 qt. Rubbermaid mash tun. The cooler I used is the one shown below:

2a92-modrnblue-xlarge


I picked it up at my local Menards for about $30. You should be also able to find them at Walmart for about $40. I chose this cooler because I've purchased a few of them over the past years, so I know they'll likely be making them for a while. Also, the design is relatively easy to build a mash tun manifold for. And, according to this chart, I should be able to make up to 10 gallons of wort comfortably in there, allowing me to eventually make double batches.

The manifold is a design that I came up with, and eventually I'll get around to actually measuring and posting dimensions of the piping so you can build one too. I used under 8' of copper pipe for it, and should have enough length left over to eventually build a fly sparge manifold (or at least a start on it). The design relies on two lengths of  bare copper wire to hold the whole thing together, and two small segments of tubing at the back of the cooler keeps the manifold  securely wedged in position. I'm not averse to soldering, or even all that concerned about contamination from the silver-based solder. My main reason for going solderless is to make it easy to clean. I can literally disassemble the entire manifold into individual components, ready for a thorough brushing if desired.

20130524_193613~01